Custom View-Master reels from your images

Custom View-Master reels from your images

£24.00

A “Retro-View” custom View-Master reel created from your own 2D or 3D images, ready to drop into any View-Master branded 3D viewer made in the last 70 years. Seven images are needed per reel.

Price is per reel (which comes complete with a retro-looking protective sleeve and wallet).

Please take a moment to read the information tabs lower down this page before starting an order.


Select your payment currency:

Estimated despatch date: Friday 7, June 2024
SKU: DS018 Category:

Description

You can supply 2D or 3D images for this View-Master compatible reel, although of course only 3D images view as 3D in a view-master viewer – ordinary 2D photos look great though. We will need seven images (or seven stereo pairs) to make up one reel.

Technical notes:
The format of viewer images is landscape only, upright images won’t work unless severely cropped.
The final images on these reels are very small – just 11.5mm x 10mm – and work best with bold and colourful photos.

Please number your photos from 1 to 7, in the order you want them viewed, so that we can prepare the reels in the correct order.

If you are a Photoshop wizard then you can prepare your images to the correct size: 1240px wide x 1125px high. DPI doesn’t matter, set whatever you like but don’t change the 1240×1125 pixel values. You might find this Photoshop template handy for image preparation: Retro-View template

Please read this page before uploading unsuitable images! Retro-view-reels

3D reel artworkYou can also order customised reel and sleeve graphics – ideal for commercial giveaways and promotions and product launches – more information here: Customised reel graphics

Image suitability

  • The format of viewer images is landscape only, upright images won’t work well unless severely cropped.
  • The final images on these reels are very small – just 11.5mm x 10mm – and work best with bold and colourful photos.

retro-view

Our Retro-View reels have images that are a very square-ish rectangle in landscape orientation. This can’t be varied, it is part and parcel of the venerable View-Master system.

Therefore, care should be taken when choosing your images. While it is possible to use other shaped images without cropping, they don’t look great as they don’t make best use of the very small image space.

If you can find your way around Photoshop then you are welcome to pre-prepare your own images. Otherwise, we will, by default, intelligently crop your images to fit the Retro-View format. You will be sent a PDF proof of the images for your approval before we produce your reel.

If you are a Photoshop wizard then you can prepare your images to the correct size: 1240px wide x 1125px high @ 300dpi.
You might find this template handy for image preparation: Retro-View template

Here below are some examples of what sort of images work and don’t work.

Girl on carousel

A nice photo but the wrong shape and orientation

Girl on carousel

Without modification, this is how the image would appear in the viewer

Girl cropped

With our intelligent cropping the image fills the view and still makes a great image

Family

This photo looks promising but the important central figures fill a wide space

family bad crop

Uh-oh, this doesn’t work well, important detail is lost when cropping, making this image unsuitable

Panorama

Great photo but this shape is going to present problems

Panorama

Without modification, this is how the image would appear in the viewer

Panorama cropped

Even with careful cropping this image has lost the drama and is therefore best avoided

Kids

This looks promising – it is a wide picture but the important content is central

Kids cropped

With our intelligent cropping this makes a great photo for a reel

Redhead

This square image looks like it will work well

Redhead cropped

Yes, it crops very well and makes a great reel image – bold, colourful and important detail away from the edges

What size should my View-Master images be?

As the reel images are so small (about 11.5mm x 10mm) you can use images from pretty much any source, including your Facebook/Instagram/Flickr/Snapchat/iPhoto libraries. However, the larger and better quality your photos are, the better quality your reels will look when magnified in the viewer.

The images are landscape orientated square-ish rectangle. You should bear this in mind when selecting your images. While it is technically possible to use upright images or wide horizontal images on a reel they don’t look great, as they view much smaller.

If you are a whizz with Photoshop (or other image editing programs) you can supply your images to the correct dimensions of 1240px wide x 1125px high @ 300dpi. You might find this template handy for image preparation: Retro-View template

How many photos on a View-Master reel?

retro-view
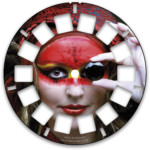
Reels have seven images. At first glance it may seem that our Retro-View (View-Master compatible) reels have many more than seven images but remember that the viewers are binocular and each eye requires its own image to create the 3D illusion. Hence the 14 image windows.

In fact View-Master reels have always had seven images, since the system was created in the 1930s. And people do ask, but it is impossible to have more than seven images on a reel. Seven images and only seven images – that’s the rule.

How to order View-Master reels

  • Gather your images
    Get your image ready before starting an online order.
    There are seven images per reel, no more, no less.
    It makes sense to put them in their own folder, ready for uploading. If you number the photos in a logical way then we will know the order they should be viewed on the reel. Just naming 1 to 7 is sufficient and if there is more than one reel in the order then A1 to A7, then B1 to B7 etc will make perfect sense. It is worth having a look at the ‘Your images’ tab to find out the best way to prepare images for best quality View-Master reels.
  • Choose your products
    Adjust the quantity of reels required.
  • Upload
    Then simply drag your images onto the uploader box. This can be one by one, a batch, or several batches.
    They will start previewing straight away – you will see thumbnails of each image. Double-check all the images are there (you can remove or add to the list) then click the ‘Upload your images’ button to transfer them to us. Click ‘Add to cart’.
  • Checkout
    Double check your order is correct, select your delivery option, if available.
    Click ‘proceed to checkout’.
  • Finalise order
    Now fill in your billing address (where your credit/debit card or PayPal is registered to). You can have your viewers and reels delivered to an alternative address if you wish.
    There is a order notes box where you can add any additions instructions, if any.
    A correct email address is vital as you will be kept up to date on order progress, you will be sent a proof by email and we may need to contact you if we have any queries.
    You can revise your delivery option if you wish.
    Select your payment option, then click on ‘Place order’.
  • Payment
    Once payment is completed you will be sent back to this website and your personal order page.
  • Review
    Double check your shipping address please.
    Keep an eye on your emails as you will be kept up to date with order progress.
    Once we have checked the images you will be sent a proof sheet by email that shows how your images will appear on the reel. This will need approval before manufacture begins.
  • Wait for delivery!
Go to Top