Retro-View reels
 We have spent years working out the best way to produce reproduction custom View-Master film reels. The actual digital image to photographic image process was the easy part – we have been doing that for over 30 years. Trickier were issues of image alignment and reel assembly, and what we have ended up with took aspects of the original mass-produced reels of old that is scaled down to low volume production.
 2D or 3D?
All reels, as standard, have seven images (and this can’t be changed).
If you want the reels to view as 3D (stereo) in the viewer, then you must either supply 3D camera image pairs and order our standard reel here: Custom View-Master reels from your images – Digital Slides
or choose our AI created reel from 2D images here: Customised 3D View-Master reels from your 2D images – Digital Slides
Of course, ordinary photos (2D) don’t view as 3D. But in fact most of the reels we produce are 2D and they look great, retaining the fun of the ‘retro’ vibe.
Technical notes:
- The format of viewer images is landscape only, upright images won’t work well unless severely cropped.
- The final images on these reels are very small – just 11.5mm x 10mm – and work best with bold and colourful photos.
- Reels have seven images. At first glance it may seem that our Retro-View (View-Master compatible) reels have many more than seven images but remember that the viewers are binocular and each eye requires its own image to create the 3D illusion. Hence the 14 image windows. Most of the reels we supply are created from 2D images, therefore the image is simply printed twice – one for the left eye, one for the right. No 3D illusion, but 2D images look fab anyway. In fact View-Master reels have always had seven images, since the system was created in the 1930s. And people do ask, but it is impossible to have more than seven images on a reel. Seven images and only seven images – that’s the rule.
If you are a Photoshop wizard then you can prepare your images to the correct size: 1240px wide x 1125px high @ 300dpi. You might find this template handy for image preparation: Retro-View template
Image choice
Our Retro-View reels have images that are a very square-ish rectangle in landscape orientation. This can’t be varied, it is part and parcel of the venerable View-Master system.
Therefore, care should be taken when choosing your images. While it is possible to use other shaped images without cropping, they don’t look great as they don’t make best use of the very small image space.
If you can find your way around Photoshop then you are welcome to pre-prepare your own images (details lower down on this page). Otherwise, we will, by default intelligently crop your images to fit the Retro-View format.
Here below are some examples of what sort of images work and don’t work.

A nice photo but the wrong shape and orientation

Without modification, this is how the image would appear in the viewer

With our intelligent cropping the image fills the view and still makes a great image

Great photo but this shape is going to present problems

Without modification, this is how the image would appear in the viewer

Even with careful cropping this image has lost the drama of the original photo and is therefore best avoided

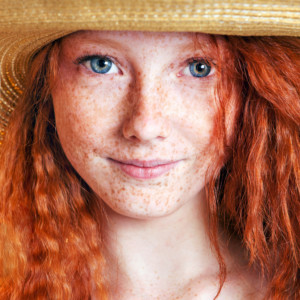
This photo looks promising but the important central figures fill a wide space

Uh-oh, this doesn’t work well, important detail is lost when cropping, making this image unsuitable

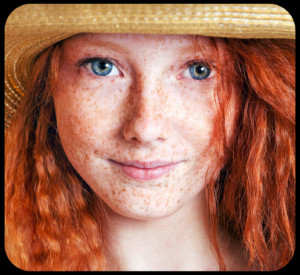
This looks promising – it is a wide picture but the important content is central

With our intelligent cropping this makes a great photo for a reel
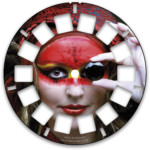
This square image looks like it will work well
Yes, it crops very well and makes a great reel image – bold, colourful and important detail away from the edges
How do I make 3D images?
There are three ways:
- Shoot your photos with a 3D camera, such as the Fujifilm W3: Finepix Real3d W3
- Shoot your photos with any digital camera (or even smartphone) using either the ‘sliding rig’ method or the ‘side step’ method or the ‘beamsplitter’ method and use software to create the image pair.
- Using Photoshop methods to create pseudo-3D effects.
- Choose our 3D View-Master reel service. This using the very latest AI techniques to create 3D images from 2D.
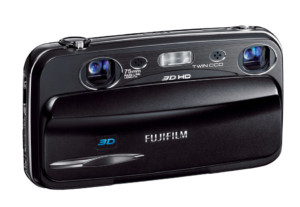 The first three methods above require some knowledge and thought. Of the four, a 3D camera is by far the most realistic and accurate – the Finepix W3 camera even has a 3D screen on the back so you can see the effect as you shoot. Methods outlined in the second category aren’t difficult but require experimentation. Some specialist and clever (if not immediately intuitive) software called StereoPhotoMaker can help a good deal. The third method requires both good Photoshop skills and a good understanding of what 3D is and how the brain interprets a pair of images and gives the illusion of depth. Some research on the internet will pay dividends and there are helpful YouTube video guides out there. Method 4 is easy-peasy as we do all the work!
Viewers
Our Retro-Reels are guaranteed to work in the viewers we sell (when we have them in stock), but will work in any “View-Master” branded viewer made since the 1940s. We can’t guarantee they will be fully compatible with other brands of miscellaneous un-branded viewers. If you buy an old View-Master viewer (zillions available on eBay and other sales platforms – don’t pay more than £20 as they are not at all rare) and you are having difficulty then we recommend you strip it down and clean it internally: debris and grease can collect on the working parts and impair reel movement and who knows what the original young owners stuffed inside! They are basic devices – older ones screwed, newer ones snapped together – and have only a disc with operating lever as part of the moulding and a spring to return the lever to the home position, that’s it.
 Can i customise further?
You can also order customised reel and sleeve graphics – ideal for commercial giveaways and promotions and product launches – more information here: Customised reel graphics